Answer:
However, best the methods of transformation (for conversion from Inputs to Outputs) be, no two pieces of output produced even under the most modern machines would be identical. Variation is inevitable.
Variation consists of two parts:
- Chance causes: This is the variation which is natural or inherent in the process.
- Assignable causes: This variation is unnatural or external due to assignable causes that can be traced.
Variations resulting from the assignable causes which can be traced, show some pattern and follow the statistical laws, i.e., laws of distribution normal, poisson, hyper-exponential, etc.
Example: Number of machines under breakdown, variation in alloy steels sheets rolled/ forged.
The pattern of distribution can be predicted from the samples of size ‘n’ taken out of the population (N). The process is said to be under statistical control if the process need not necessarily yield products confirming to specifications as the process under statistical control produces results which conform to the control limits. The main objective of quality control is to present defects during production.
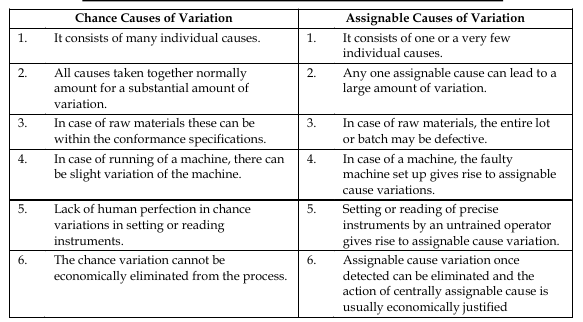
The differences between the chance causes of variation and assignable causes of variation are given below:

Causes of Variation
Inspection in a manufacturing industry is carried out to compare products with known standards or specifications. To ensure the specified quality for the acceptability of the product, inspection stages are:
- Incoming Raw Materials Stage: Here, the inspection is carried out to find whether the incoming lot is rejectable/acceptable for the manufacturer under the agreed terms of inspection plan. Single sampling plans and multi-sampling plans are in use for this purpose.
- Process Control: Inspection during manufacturing is termed as Process Control Inspection. The inspection is carried out to find the quality of products being produced is good or bad and take action to bring the process under control. Process inspection should be done at appropriate points in the process so as to provide an immediate and accurate reflection of the quality status and condition of all parts being processed.
Process Inspection may include the following checks:
- Set up and first piece inspection: First piece inspection is established by checking the first item produced in the production set up. It will establish whether the machine set up, jigs & fixtures, and gauges are correct or not, and whether proper material is being used for the job. It also eliminates the necessity of scrapping a substantial part of production, run by locating the cause for rejection and correcting the deficiencies before production starts. Therefore, the production should not begin until the first piece found is acceptable.
- Patrol inspection: Patrol inspection is perhaps the most crucial of all functions to keep the process in control throughout the production. It consists of inspection at appropriate intervals of time to verify conformity during manufacturing and is also known as floor inspection. This inspection may be conducted by operators/inspectors monitoring specified operations or by automatic inspection.
Whatever applicable, the last piece must be included in the patrol inspection.
3. Final Inspection: Final inspection of finished goods before these are despatched to next stage of production or customer helps in locating various assignable causes and taking suitable remedial actions.
- Errors associated with inspection
The errors erupt in due to the followings:
- Lack of understanding among standards of inspection.
- Lack of consistency among various inspectors.
- Improper sampling from the source population.
The errors at (i) & (ii) can be minimised but not eliminated altogether whereas the error at (iii) can be eliminated through the choice of a correct sampling plan.
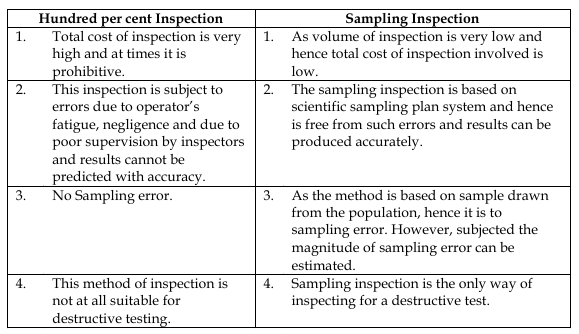
- Differences between 100% inspection and Sampling inspection

Thus, we may infer that sampling inspection is generally superior to hundred per cent inspection.
Total Views: 18
